


An explanation to accompany the YouTube video of me doing exactly that......
Not for the faint hearted DON'T try it at home!
Just to be clear I’m not a plumber. I was in the building trade a long LONG time ago and as a result of some of the comments on the video I’ve discovered a few things that didn’t exist back then so I update this blog to suit (because updating a YouTube video’s not so easy)

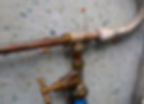
So it started when I got a call from one of my colleagues saying a pipe in our building was leaking. No problem, I'll take a look. What you see above is what I found.
The leak was on the joint of the pipe coming out to the left of the tee piece above the left hand valve (on the blue pipe)
As far as we knew, the left side blue pipe was installed some years back (maybe 20 ish) when the old supply coming in broke and leaked. We thought the right side valve fed outward to a tap on the outside of the building at the other end around 50 yards away.
Something like this if you looked at the plan of the building:-

So that's what we thought
Ohhh how wrong we were.........
I turned off the valve on the blue pipe, the left one and I went to undo the leaking tee piece
But it still kept blowing out water under pressure
Ok I thought, it must be the right hand valve that is the water main coming in and the left valve is the feed out to the tap, so I turned off the right hand valve as well and undid the pipe again. Still water gushing out. That's with both valves off. Now I will say at this point that the right hand valve didn't feel right but there wasn't much I could do about that.
Normally at this point, in the UK at least, you would go out in the street and turn off the supply there. But we can't do that because the pavement is collapsed over the shut off point and the valve is buried....

Looks ok but if you open up the inspection plate and reach down there's no valve because it's all pushed sideways. And it also is leaking but that is a matter for the Water Authority.
So what to do?
I went back in the building and turned off both valves as far as I could thinking "well the right hand valve isn't great but the left hand one should be ok so we'll see what happens if I undo a pipe
I undid the pipe on the right side of the tee piece and yet again, water gushing out.
But mainly gushing out of the left side.
WHAT?
So I tightened up the nut on the left side of the tee as much as I could and the leak stopped.
Great!! I went away thinking "one day I'll need to fix all that"
Two weeks later.......
I took a call from a colleague saying "yeah the pipe is leaking again".
Let's recap then:
I have two stopcocks (stop valves)
Neither of them seem to shut off the water fully
Both of them seem like they might be main feeds (still wasn't sure at this point, why would they be? Didn't make sense)
I can't shut off the main supply in the road
I've got a leak that I need to strip all the pipework down to fix
Well it's easy, I'll just change the left stop valve live in the building without turning off the water............
Preparation:
I got a valve identical to the one that had failed
I got some other connections and fittings "just in case"
I got a hose to connect to the new valve for when I "hot swapped" it
I got a wet n dry vac to get the water up off the floor after
I got a waterproof suit (kind of a waterproof onesie, no fashion prizes)
I got my waterproof camera because I knew things would get interesting
You take the new valve and connect the hose to it
You put the end of the hose down a drain or something, in my case it was a w/c the other side of a wall
You fully open up the new valve
You open a couple of taps on the main system to try and let the pressure off a little
Then you calm yourself and...
With the new valve and hose ready to go, undo the nut on the bottom of the old valve while holding it onto the pipe against the pressure. Then you quickly whip off the old valve, put the new valve on and hold it in place as you retighten the nut onto the bottom of it.
Once you've done that you can just turn off the valve and remove the hose.
So so simple, what could possibly go wrong
Welllll...
The hose blew out of the w/c (twice) and so the water from that was going all over the floor.
The union nut felt like it was cross threading onto the valve so that was a worry that it wouldn't hold.
When I finally got that sorted and went to disconnect the pipework to fix the original leak, that was when I found that the other valve (which if you recall also didn't close off properly) was DEFINITELY also an incoming main.
And because the valve was leaking I had to quickly put an isolator on another piece of the pipework (the one forom the right side of the tee piece going onto the pushfit connector) so I could finally fix the original leak. Remember what I said about extra fittings and stuff "just in case"?
This is how it ended up

It looks ugly as heck but it does the job for the time being
So we have:
Blue plastic water main coming up with a new stopcock on it going into a tee piece
The tee piece splits to the left where there's a new isolator valve to shut off two sinks and a toilet if needed (no way to isolate before)
The other leg of the tee piece then goes up and into another isolator before it goes into the flex connector onto the pushfit plastic that connects down onto the other incoming main and also goes up to a cold water storage tank in the roof space.
Next task is to put a new stopcock in the old main coming up from the floor. That'll be a pushfit isolator into the white plastic line that will be turned off and never re-opened.
And if you're thinking why doesn't he just cap it off? Because I can't turn it off and getting a cap onto the end of the live mains supply is a challenge too far so I'll repeat the same process as I did with the other stopcock but I'll fit new further up the line because I daren't disturb that old steel pipe too much. You know what'll happen if I do.
How did this mess all come about?
Well it's taken some thought but I think we've figured it.
Maybe 20 or so years ago there was a leak outside the building in the main feed in. As I said at the start, we always believed that the contractor had replaced the old steel with plastic and connected it like this
However, sometime last year there was another leak outside the building and one of my colleagues was saying that when they dug it out they found a tee piece that disappeared off somewhere like this

The whole of that area is under about 1ft or 300mm of concrete so we weren't sufficiently curious to dig all that up just to find out.
So now we think maybe what actually happened was this was the original layout

We know the tap at the far end of the building is connected outside the building.
We thought the right hand pipe inside the building fed out to it but that's mains pressure so it's obviously not the case, or not quite in that way at least.
We then think when the original leak happened, the contractor disconnected the section of leaking pipe and connected into the water main in the street but he connected the tee piece we found under the concrete to the remains of the old line into the building.
So first this

And to fix it he did this

So now you can see that there's effectively two main feeds into the building Oh and a feed to the tap at the far end that still can't be isolated........
That also gives us an answer to the stopcock failure (or one of them)
If I try to shut off the original stopcock in the steel main, it just feels like the washer is entirely gone, we think its a good sixty or so years old so it's more than possible.
For the one that was on the plastic main though, it felt like the washer was on it so I thought it must just be worn. But when I took it apart the washer had actually come right off and was lodged to the side of the seat. So although I could "feel" it, it wasn't doing anything. My thinking on this is that when the outside leak happened last year, the tee under the concrete came apart and I guess it made the water flow in the reverse direction through the valve and pushed the washer off its seat as below

Conclusion
Would I do the job again? Yes it doesn't concern me.
Would I do the same job in a home? Nope!! If you watch the video I talk about the fact I took 60 litres (13 gallons) of water up off the floor after. Now some of that was because I got it wrong with the hose down the w/c but even then, just a little water can go a long way especially in a home, down your walls, through your ceilings. And if you think it won't stain because it's clean water you're wrong. It will wash any crap through as it goes and run it everywhere.
There is also so much more that could have gone badly wrong. If the new valve hadn't fitted or I hadn't had the other fittings, if the incoming main pipe had been damaged, if any of that stuff happened, the water is going to keep gushing out whether you like it or not.
Would a professional plumber do it any different?
Maybe. With a decent pipe freezer you could freeze the blue plastic main and the white plastic. But you'd need to know how it's piped up to know to do that. It would have helped with changing the valve on the blue main but not on the steel one. Although I may do exactly that when I put the isolator in the white plastic line.
Also, you could go the whole nine yards and get the water authority in to sort out the lack of isolation in the street. Hmmm, that's actually fenced off and has been for about 6 months (the photos are from earlier) because it's on their list to fix but if I waited for that we'd have ended up needing an ark.....
Anyway, it gives the YouTube folk something to watch!
Like I said, don't try this at home :-)
Some extra thoughts:
There’s been a discussion in the comments on the video about pipe freezers. For the record, I tried this with the cheap version of the Arctic Hayes kit. It didn’t work. This may be due to the fact water was constantly flowing through the pipe and trying to freeze running water is a challenge. I also wasn’t impressed by the kit. It was the one with just a plain sleeve and an aerosol of freeze spray with a feed straw. I then bought the better Arctic Hayes kit with the screw on pipes and sleeves. I didn’t try it on this because of the constant flow problem.
One of the comments suggested buying the Rothenberger kit so I thought it might be useful to look at the cost comparisons:
Arctic Hayes basic kit (the one I tried) £23.99
Arctic Hayes better kit (the one I have now but didn’t try) £177.44
I got mine on ebay for £80
Rothenberger aerosol kit
Rothenberger electric freeze kit £700
So, if I were a tradesman with a lot of calls to jobs where I needed to freeze a pipe then I’d get the Rothenberger electric. Or maybe I wouldn’t becasue the issue I see with both the Rothenberger kits is they seem to have clamps that are purpose made for specific pipe sizes. If that’s true then they’d be no use at all on a pipe size that doesn’t suit their clamps. In that situation I’d still go for the Arctic Hayes because it has adjustable sleeves that would tighten down onto non standard sizes.
But then in the situation I was in, trying to shut off a length of the 25mm blue plastic underground main, I also now know that you can get a pipe squeeze clamp from Toolstation for £30
So actually I’d probably have used that. Or again maybe I wouldn't. I know the pipe is a good 15 - 20 years old. The air temperature was only about 4 or 5 degrees. Would the pipe become brittle with age or cold? I don’t know.
Update: I’m assured by a number of folk in the comments that this is a preferred solution. So on that basis it’s what I’d try now.
But as it worked out I didn’t have to resort to any of these extra tools and costs.
Am I suggesting anyone else should do the same? NOOOOOOO!!!!!!!
What I’m trying to do though is give an explanation of some of the possible ways to solve it. You choose your way at your risk 😊
Update on public liability insurance.
I was asked in the comments if I have public liability insurance. So lets explore that. PL insurance would cover me as a contractor for damage to the customer’s property in the event of something going wrong (like a pipe that I was working on flooding the building maybe). There is no legal obligation to have PL insurance BUT there would likely be a legal obligation on a contractor to pay damages in the event of something really bad happening in a customer’s premises so the idea is that you have the insurance to mitigate the cost of those damages.
The question is relevant for anyone doing such a job in somebody else’s premises because if an accident happened it could be very costly.
Further to having PL insurance there would also need to be a level of competence applied during the work in order for the insurer to consider payment of any such claim. Also things like risk assessments, safe systems of work and the like come into play.
I’m not going to go into laborious detail but while, as I said at the start, I’m not a plumber, in this situation I was not a contractor (it’s my own company premises) and there was a whole lot of background work went on before I carried out the work. And had it gone wrong it would have been an insured risk.
But as always, if you’re thinking of doing something like this, even for yourself, make sure you are fully aware of the risks before you start. Or pass the job on to a tradesperson with a proven track record of the work you need doing and PL insurance to cover any issues.
Want to know more? Got questions or comments? Add them below or use the Ask a question button
Interaction is everything!